By Scott Sellers
COO Editorial Board
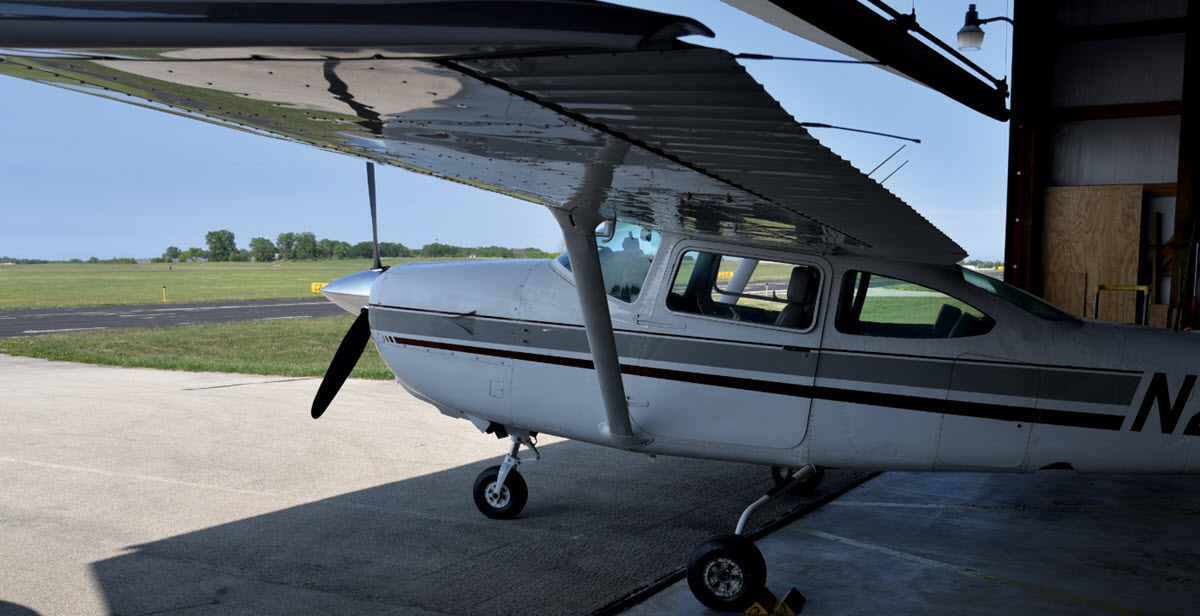
Surfing the aircraft-for-sale sites has become a pastime for many of us. Occasionally you may be ready to jump into the pool of actual buyers. I found myself in that pool in 2020, having sold our beloved 1974 C182P after 11 years of ownership.
Once you’ve narrowed the choices to a model and price range that fits, you will find current market conditions are such that desirable/good condition airplanes sell quickly, and those remaining need a close look to confirm their condition. This is where the prepurchase inspection becomes your tool to determine condition and the budget requirements to transform this airplane to fit your mission.
After agreeing on price and signing a purchase agreement with the seller (see AOPA’s Sample Aircraft Purchase/Sales Agreement), you’re ready to start the prebuy.
Keep in mind the goal of the prepurchase inspection is to identify airworthiness items in need of repair, and not a measure of the aesthetic condition of things like paint, carpet, and upholstery.
Contribute your prebuy tips. Help other pilots. Click here.
Your Prepurchase Checklist
Keep in mind the goal of the prepurchase inspection is to identify airworthiness items in need of repair, and not a measure of the aesthetic condition of things like paint, carpet, and upholstery — hopefully you accounted for these items in your offer. Also remember that you as the buyer are paying the cost of the prepurchase inspection and travel expenses related to it.
1. Find a Shop
Find a shop near the prospective airplane’s home base with expertise in this type/model of airplane. Ask about lead times to schedule the prebuy inspection. It is typical now that shops are backed up, in some cases many months. It can be difficult to find a shop within a reasonable distance (perhaps a one-hour flight) of where the aircraft is based. Since our candidate 182RG was in a different time zone, we had no knowledge about local maintenance shops. So we engaged a nationally recognized prebuy service and were lucky to find a great shop who could do the prebuy within two weeks.
In the event a major repair item is found in the prebuy inspection, you should also ask the inspecting shop about their availability to perform that work in the event you decide to proceed with the purchase. A major airframe item was found on our prebuy that took more than four weeks to repair. This is a big deal!
The shop selected must not have inspected this airplane before and the shop must have no relationship with the seller, as well. Many aircraft buyers make this mistake — you shouldn’t be one of them.
2. Get a Part 91 Prebuy
Once you’ve found a shop, ask to review their prebuy inspection list for the aircraft type to make sure any items of concern are included. Make sure that you tell them it’s for Part 91 and not Part 135.Many shops will give you a Part 135 prebuy, and the result may scare you. Many items that are required for Part 135 don’t apply to Part 91.
Have your mechanic review that list in the event you’re not familiar. In our case, we requested that the lift strut AD/service bulletin inspection be included in the prebuy since the AD was due to be made mandatory in the near future (it was ultimately published in October 2020).
3. Pass Responsibility to the Seller
If the inspection finds a major repair/roadblock item, then it becomes the seller’s responsibility to pay for the repair, or as the buyer it is your option to discontinue proceeding with purchase of the airplane.
In our prebuy, the repair list paid for by the seller came to almost $20,000 and included major airframe items. This is where expertise in the type/model matters, since any items the shop misses will be paid for by you in the future (presuming you proceed to buy the airplane).
How can an airplane be in current annual inspection and airworthy status and still need major repairs? This is a common story, so it is ideal for you to visit the shop (we were not able) at this time and observe repair items and see the airframe while it’s opened up.
4. Get Related Projects Done
Consider related repair items while airworthiness repairs are performed. This can save you money in the short run. Thanks to the prebuy shop’s expertise, a service bulletin on the nose gear that had not been performed was found. We paid for this work to be done while other repair work in that area was being done.
There was risk involved because we had not yet purchased the airplane, but this saved lots of labor needed to access the already disassembled nose gear.
If the prebuy inspection yields an airplane you decide to purchase and you’re pleased with the shop, it may make sense to turn the prebuy into an annual inspection.
5. Make the Prebuy an Annual
If the prebuy inspection yields an airplane you decide to purchase and you’re pleased with the shop, it may make sense to turn the prebuy into an annual inspection. Our 182RG had significant airframe repair items and the annual was recently completed, so we did not turn the prebuy into an annual inspection.
However, we were very pleased with the quality of airframe repair work performed by the prebuy shop (at the seller’s expense). If you decide to proceed with purchasing the airplane, then turning the prebuy into an annual inspection is not a great deal more work, so it’s another opportunity for short-term cost savings.
“I bought a used airplane” — Click here for more prebuy tips from a Cessna owner.
Prebuy Costs: What to Expect
Typical cost for prepurchase inspection for a single-engine Cessna is 8 to 10 hours at a shop rate of $100 an hour (ask the shop for their hourly rate to confirm) for ease of figuring. That’s about $1,000 and includes a review of logbooks. Our prebuy inspection came in at $750. We spent an additional $750 to engage Savvy’s Prebuy Service, since the airplane was far from us and we were not familiar with shops near the airplane’s home base.
Proceed to Purchase?
Upon completion of the prebuy inspection, it’s time to decide if you will be buying this airplane. To help calm your emotions, you now have objective data from the prebuy to support your decision to buy or not.
It’s fair to ask the prebuy shop what they would do in your shoes and to get their candid opinion on the airplane. We did exactly that and found the prebuy shop’s input to be invaluable in deciding to proceed with the purchase.
Additionally, our 182RG came with aftermarket mods, including the Robertson STOL and Air Plains 300 hp conversions, that added to its value for our purposes and helped make the buy decision easier.
Contribute your prebuy tips. Help other pilots. Click here.
Prebuy Takeaways
- The prepurchase inspection is a critical milestone in deciding whether or not to purchase this particular airplane.
- In the current red-hot single-engine aircraft market, Cessnas are a desirable airplane to purchase.
- You may accept an airplane for purchase in greater need of significant repair work due to few other available options — we sure did.
- A thorough prebuy is key to knowing the condition of the airplane you are buying, so working closely with the repair shop of choice is key to informing your decision to proceed with the purchase.
- The prepurchase inspection clarifies the airplane’s condition with focus on the big-ticket items like airframe, engine, and landing gear system if it’s a retractable. The discrepancy list the prebuy inspection creates served as the repair list ($20,000 of repair work in our case) the seller provides prior to closing on the purchase of the airplane.


