By Jerry LeCroy
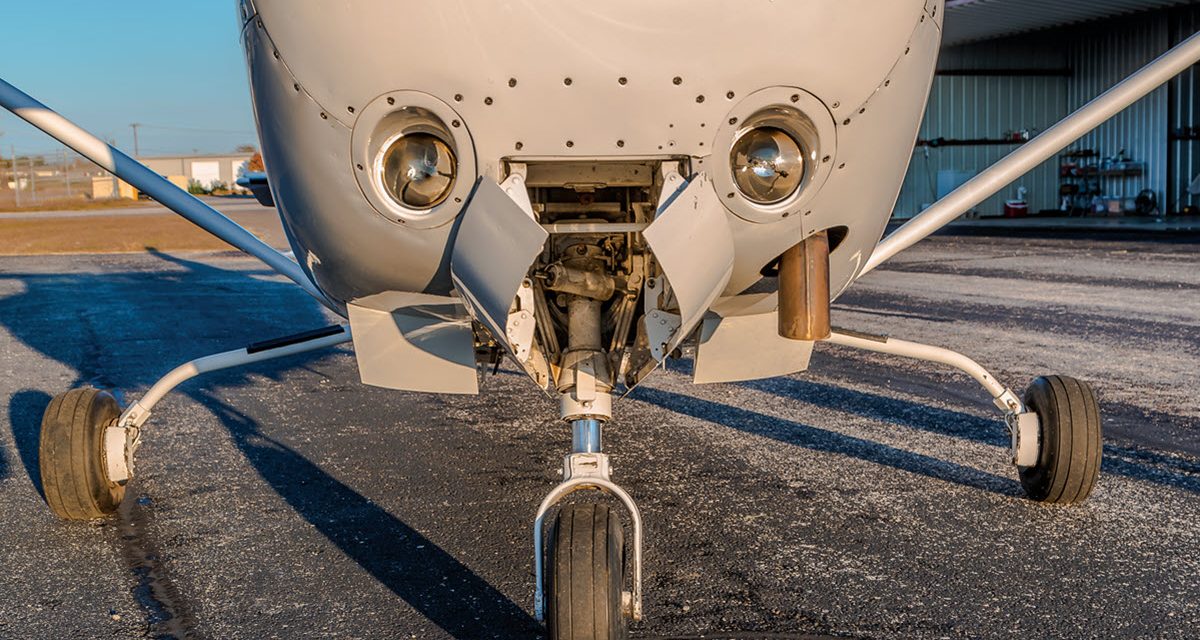
One evening last spring, I went out to the airport to do some night landings in our R182. On the first takeoff roll, just before rotation, I was startled by an energetic nose wheel shimmy. Yowie! I went ahead and did the three landings I needed for night currency but made it a point to keep the nose up as much as possible. My experience with Cessnas indicates that when the nose strut is fully extended, the tendency to shimmy is reduced. Sure enough, I felt a little incipient shimmy in the rudder pedals, but no full-fledged excitement.
Taxiing back to the hangar, though, I found that nosewheel steering was pretty limited to left turns. What the heck? I already knew I needed to service the shimmy damper and check the whole steering linkage, but now I had even more to look at.
Flash back 40 years, when we acquired our very first airplane, a 1974 150L. After flying that airplane about a year, it started to exhibit noticeable nosewheel shimmy. One mechanic I spoke with basically told me “they all do that.” Happily, I was able to get the chief mechanic for my employer’s aircraft fleet to take a peek at the problem. He had worked on Cessnas for years, fixed it pretty quickly, and taught me the basics of shimmy prevention.
The Onset of Shimmy
Shimmy onset occurs because as the rotating wheel encounters an initial angular excursion in the roll axis, perhaps due to imbalance in the tire. Once the initial rotation happens, gyroscopic precession moments cause a torque reaction in the steering axis. If the steering torque causes the wheel axis to move left or right, that in turn creates another moment across the roll axis, making for a mechanical positive feedback loop.
You might note that static balancing, which is mostly what we do with light airplane tires, will not actually prevent initiating a shimmy. Shimmy is set off more by out-of-plane imbalance, and we would need to do spin balancing (dynamic balance) to cure that. Often, though, any out-of-plane imbalance is due to irregularities in the tread, typically due to skid wear. That source of trouble can sometimes be corrected by sanding off the excess tread material on the fat side with a belt sander. I imagine that takes a steady hand. But if you see a big flat spot on your nose tire, perhaps due to an unfortunate crosswind landing, maybe putting a new tire on is a better idea than sanding all the tread off the rest of the tire.
We can’t actually prevent all incipient shimmy — no tire is perfectly balanced, and there are other events that can initiate a shimmy event. What we can do, however, is to tweak the mechanical system to limit the magnitude of the shimmy response. How? The key seems to be that shimmy is driven by precession forces. If we are able to reduce the slop in the fork and steering hardware to a minimum, the uncontrolled initial rotations are small, so the precession forces stay small and incipient shimmy remains incipient.
Reduce slop? Slop is the very technical term for the backlash or free movement possible in the steering mechanism before any restoring forces can be applied. If there is any noticeable free motion in the steering load path between your nosewheel and your shimmy damper or rudder pedals, where restoring forces can resist movement, then you may have a shimmy problem.
How to Check for Slop in Your Nose Wheel
There are a couple of ways to check for slop in your nose wheel. The quick and easy way is to lift the front of the airplane, grab the nose wheel, and try turning it left and right, maybe with a partner in the cabin holding the rudder pedals fixed. If you feel a little free motion before you encounter resistance, you know that you have room for improvement in the mechanical linkages.
I like to roll the nose wheel over a couple metal plates, with a layer of wheel bearing grease between the plates. That allows me to check for slop in the steering with normal weight on the nose wheel and the strut compressed. Strut compression matters, because there is a block on the strut that tries to hold the wheel straight ahead at full strut extension. Wear and looseness in the scissors joints will be much more noticeable with the strut partly compressed. At our hangar, we have a couple thin sheets of aluminum from Lowe’s, which are fine for working on a Cessna. My partner tells me that for big jets, they use heavy steel plates.
Select photo for larger image
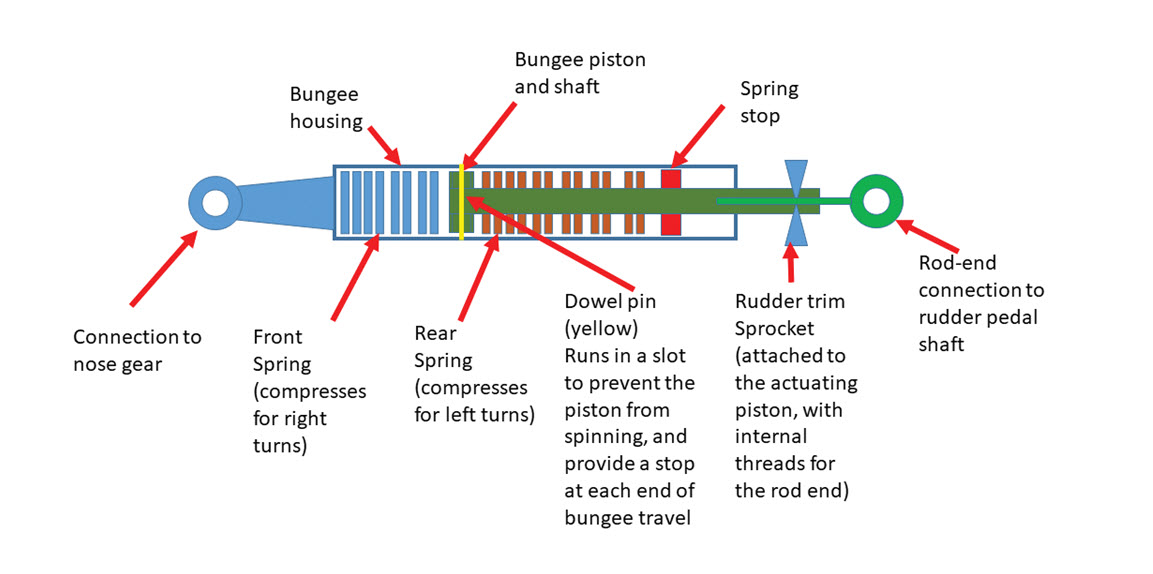


What we want to happen is for the shimmy damper and rudder linkage to begin moving just as soon as the axle starts to turn left or right. There are a few places where parts can develop slack if the wheel bearings are mis-adjusted or loose. On our Cessnas, axle nuts provide preload to the wheel bearings. That fastener torque wants to be just right. Too loose and the wheel can wobble, too tight and the bearings may run hot.
There are three joints in the scissor link that connects the lower strut to the upper strut. On Cessna airplanes, these three hinge points can wear, creating a loose connection. Most of the time wear can be taken up by shimming the joints, replacing the joint bushings, and maybe replacing the hinge screws. McFarlane sells torque link service kits that include all the necessary screws, nuts, bushings, and shims to tighten up your scissor joints. Once you make the effort to tighten up those scissors links, I bet you will pay more attention to keeping them greased so you don’t ever have to do it again.
There are two links in the mechanism to the shimmy damper. As with the scissor links, slop can be remediated by replacing worn screws, replacing bushings, and shimming the linkage.
What Went Wrong
The rest of this article can be seen only by paid members who are logged in.Have a website login already? Log in and start reading now.
Never created a website login before? Find your Customer Number (it’s on your mailing label) and register here.
JOIN HERE
Still have questions? Contact us here.


