A&P/IA Member Tells the Tale of Chasing Cessna Carbon Monoxide
By Jerry LeCroy
Several years ago, my partners and I upgraded from the Piper Archer that had served us faithfully for 25 years to a Cessna R182. I was about to retire and wanted to have a ride with better weight capacity, more speed, and longer legs. The Skylane RG met all those criteria.
Oddly enough, I found that fuel burn on our usual trips was almost identical to what we consumed flying the Archer. Given the improved payload and speed, the Skylane felt like a rare bargain.
We had always kept one of the color-changing chemical carbon monoxide detectors in the Archer’s cabin. I never noticed a color change, but I wasn’t looking that closely, either. Going into our first winter with the new-to-us Cessna, I decided to look for a more definitive take on exhaust gas levels in the cabin. After a brief internet search, I remembered the Honeywell BW Clip detectors.
Because of its importance, this article is being made free to non-members. Support the continued creation of stories like this by joining today.

Honeywell BW Clip
The BW Clip is used as a personal gas monitor by workers in several industries. They come in several flavors — multi-gas, hydrogen sulfide, low oxygen, and of course the ever-popular carbon monoxide. I used one of these instruments for the first time back in 2000, when I was doing some indoor noise testing on a propane-fired generator and didn’t want to be a carbon monoxide test casualty.
The Clip has essentially no user adjustments but offers a digital display of CO level in ppm. The one I selected has preset alarms at 20 and 35 ppm. It is designed to last two years, and a countdown timer starts when the owner first powers it up. No replacing the battery or detector — just buy another Clip after two years. It comes out to less than five bucks a month; cheap if it only saves your life once.
The alarm is not loud enough for my aging ears to hear it over the din of a 182 cabin, though my wife points it out when it’s alarming — she can hear it. For me, the flashing light is an attention-getter.
Increasing Cessna Carbon Monoxide Alarms
Shortly after putting a Clip into use in our plane, we started seeing occasional alarm trips. Typical cases were during a run-up with a tailwind and windows open. The wind blows engine exhaust forward, and the sensor alarms. That will teach you to not do a runup with the window open!
As time went on, we began seeing more frequent and longer alarms. These started out only during climb. In climb attitude, the engine exhaust is running along the airplane’s belly and the mixture is rich, so there is plenty of carbon monoxide being generated.
Leaning the mixture and increasing airspeed in climb both improved the readings, and CO mostly settled to near zero in cruise. I did not consider the observed levels to be a personnel hazard. After all, the most we ever saw was about 35 ppm, and the OSHA limit for time-averaged, eight-hour industrial exposure is 50 ppm. All the same, it was a nuisance I wanted to fix.
Because of its importance, this article is being made free to non-members. Support the continued creation of stories like this by joining today.

The Search Begins
I started out looking for exhaust gas entry possibilities. The baggage door gasket was torn — I replaced that. No real change.
Then I replaced the cabin door gaskets and later the window gaskets. Still very little improvement.
I tried sealing up various holes in the cabin floor, taping over some holes and adding gaskets to some of the access panels (the ones over the MLG actuators and gear pivots). No real detectable change. Well, actually there was change — the problem got worse.
Over the past couple years, we went from seeing zero CO in cruise to low and then moderately high (20 to 30 ppm) CO levels, even in cruise flight. Obviously, it was time to make another attempt at sealing up gas entry points.
By the way, I did test whether the CO we observed in the cabin might be coming in from up front. I inspected the entire exhaust system and the firewall carefully. I did not find any exhaust leaks or see any open penetrations in the firewall. I also tried operating cabin heat and held the CO monitor next to the heater outlet. Not a blip.
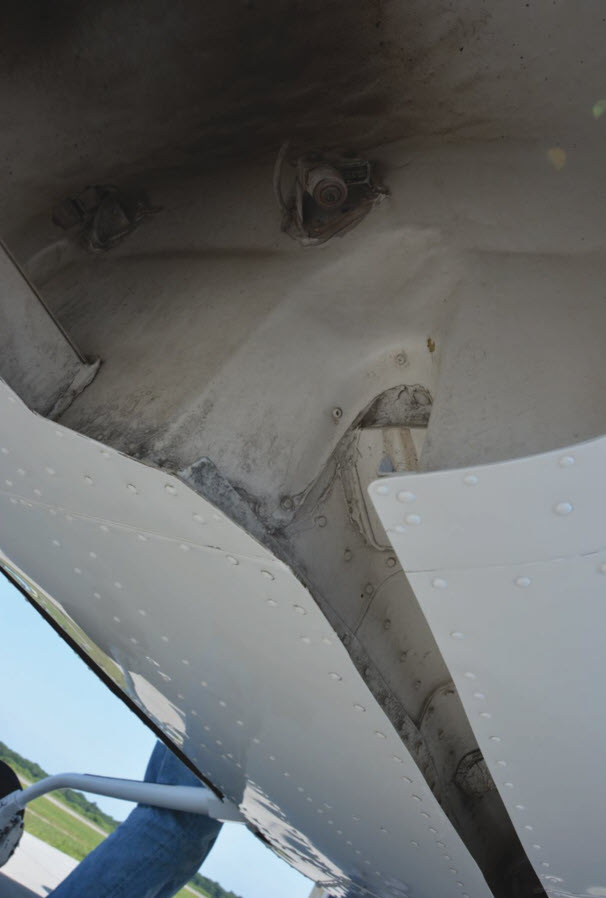
Next, I read a thread on the Cessna Owner Organization forum in which some owners found issues with the gear wells. Next job — seal up the wells. Actually, the next job was to get the belly, gear tunnels, and gear wells all as clean as possible, both so I could see what was going on and so that any sealant I applied might have a chance of adhering.
To the Belly
Do you degrease your airplane’s belly often? Neither do I. One partner asked me what the black stuff in the tunnels and wheel well was made of. I told him it was dirt, but that somewhere under the coating of soil we would find fiberglass liners.
I degreased the belly with a mineral spirits spray and a scrub brush, until it was starting to look clean. I like mineral spirits for this job; they are less flammable than alternative solvents and unlikely to damage sound paint. After a second trip down the belly with clean mineral spirits and a wipe-down, I did a third sweep with denatured alcohol. The alcohol was intended to remove any remaining film of petroleum distillate.
Because of its importance, this article is being made free to non-members. Support the continued creation of stories like this by joining today.
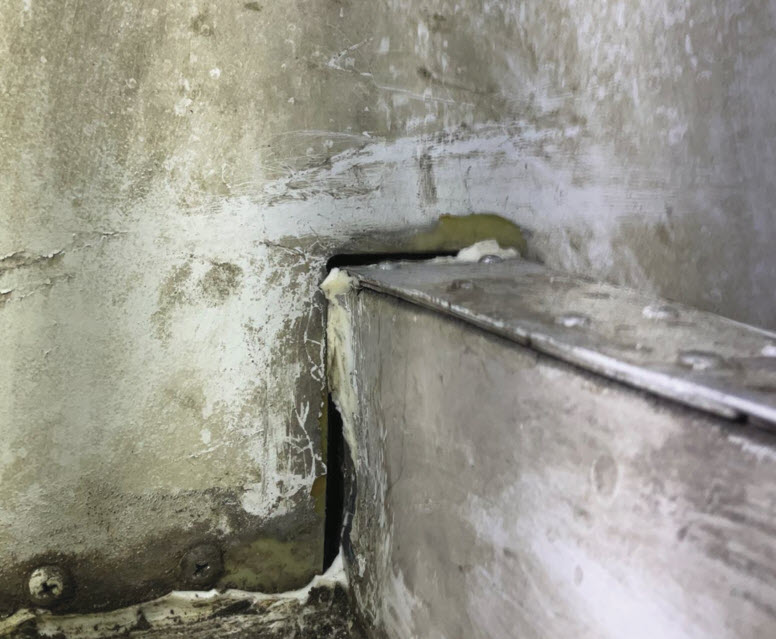
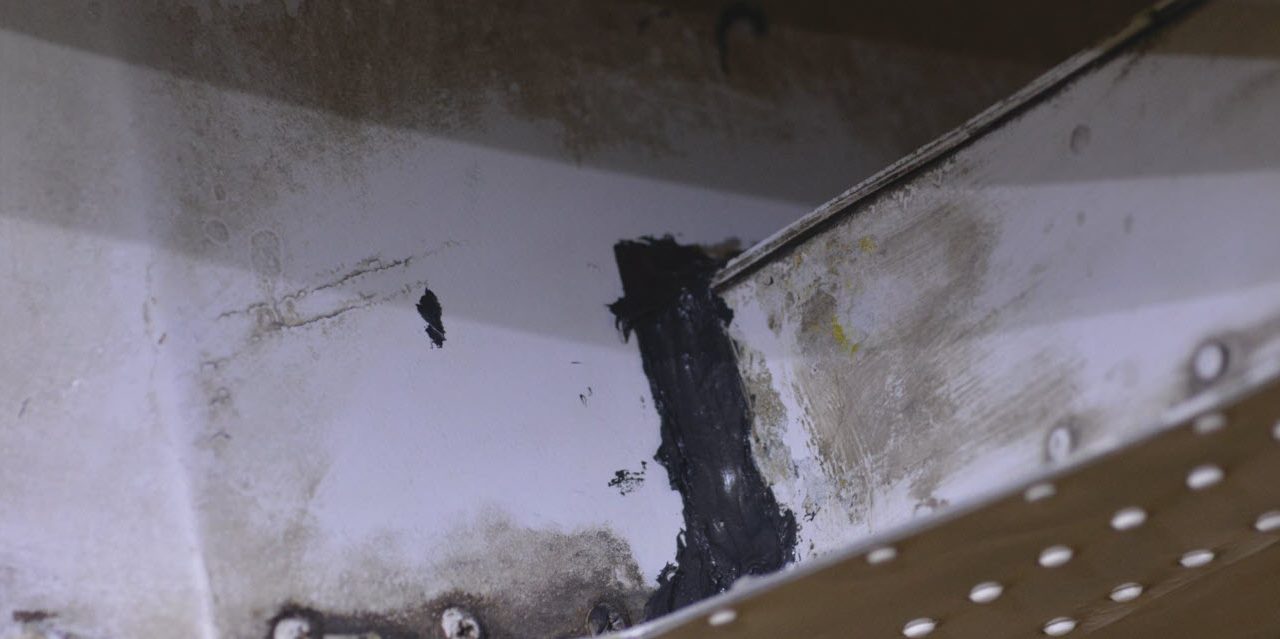
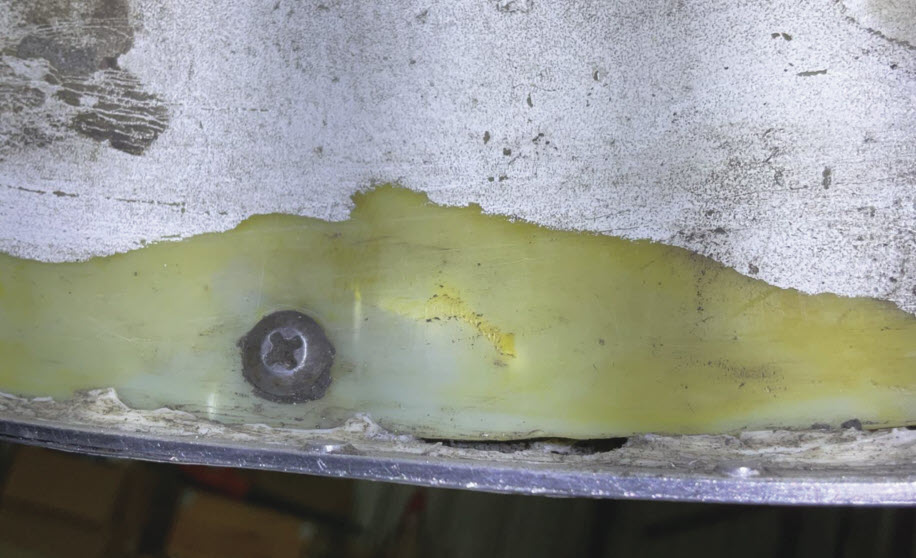
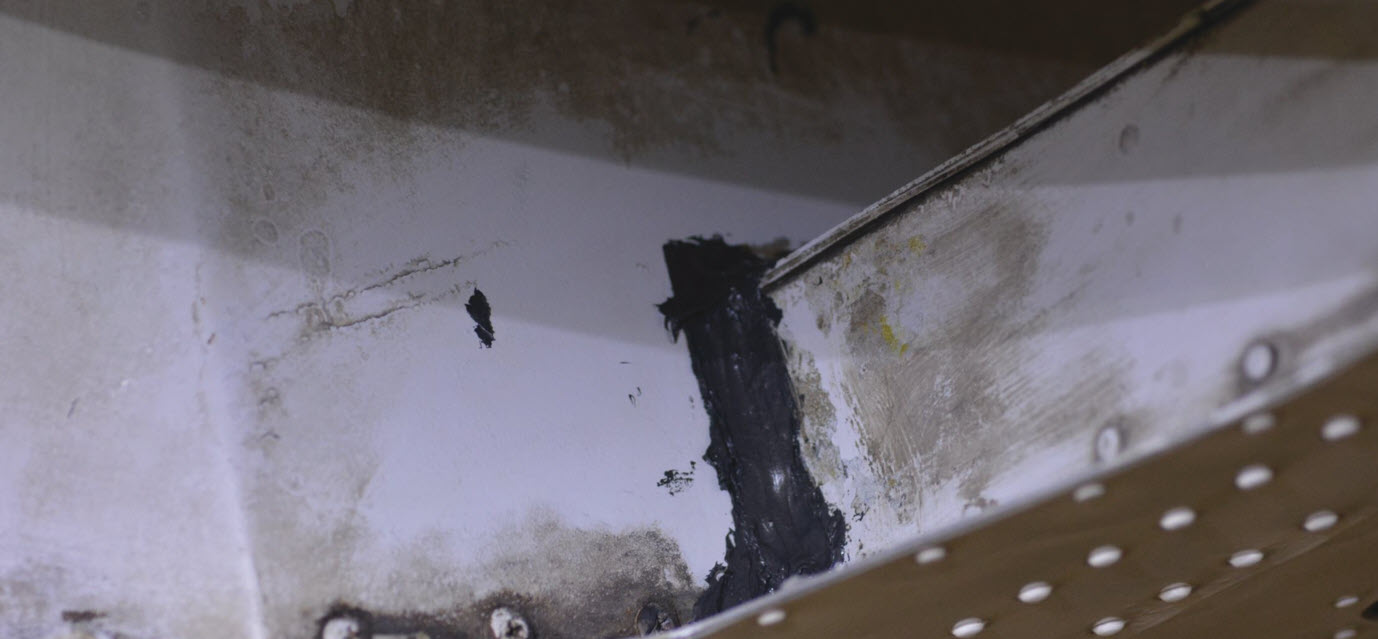
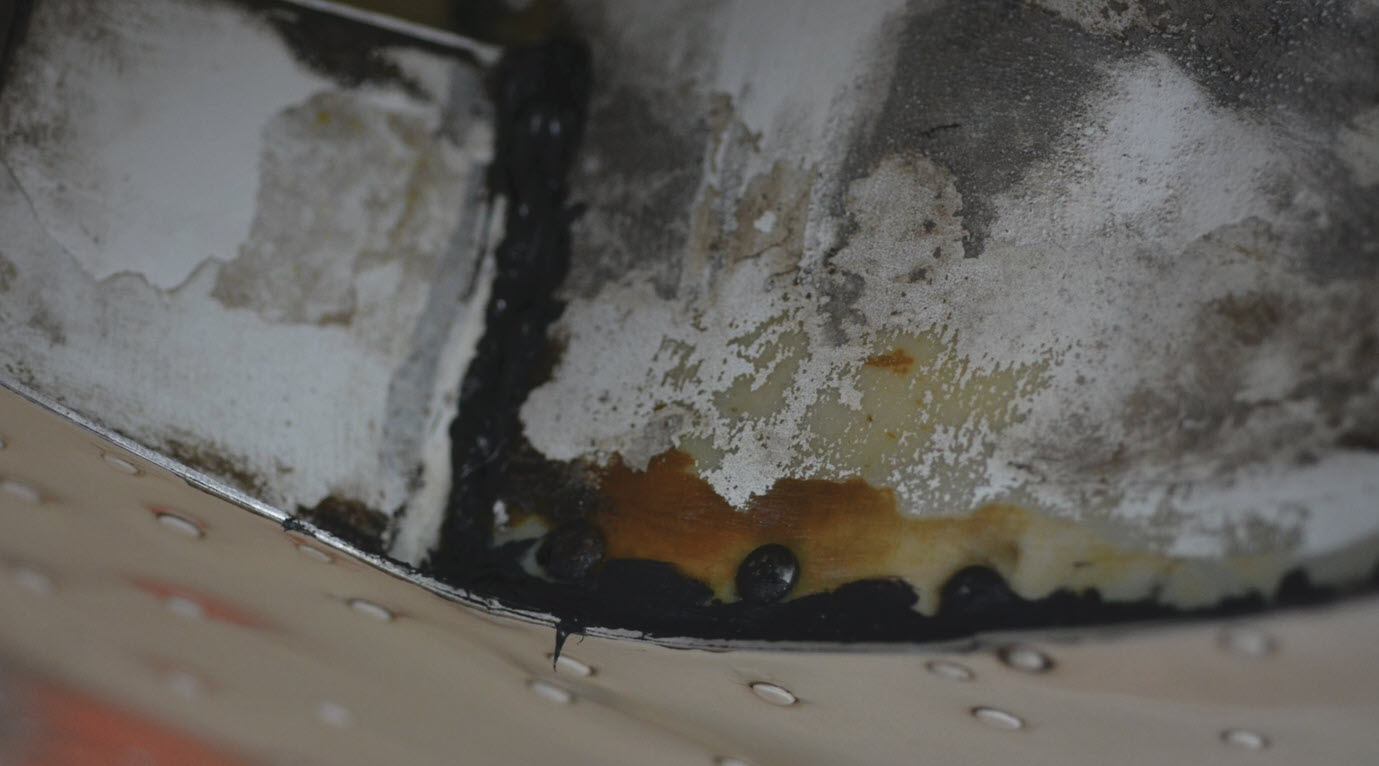
Then I assembled a group of lights and mirrors and a camera and started looking for cracks. They turned out to be embarrassingly easy to find. The tunnel and gear bay liners are fiberglass and were sealed to the aluminum structure with what appears to be a tough hard sealant. I failed to find a reference in either the Cessna parts book or maintenance manual, but I suspect that the factory used the same polysulfide sealant that was applied to seal the fuel tanks. After all, they had that sealant on hand in the assembly line, and it’s pretty durable.
On our plane, at some time in the past, it appears that parts of the original seal failed. Some previous maintainer appears to have resealed the gaps with white silicone seal (bath/shower caulk?). After a few years, exposure to structural deflection under air loads and belly oil combined to cause that seal to fail. There were substantial gaps visible.
Aha! I guess that the doorless wheel well acts just like an air scoop and gets somewhat pressurized with an air-exhaust mixture in flight. If there are gaps between the fiberglass liners and airplane structure, the gas will then find its way into the cabin.
Now to Re-Seal
What to seal it with? My thinking was that the best sealant would be fuel tank sealant, as specified in the airplane maintenance manual. We did not have any of that material on hand, so I tried a stop-gap solution with Permatex Ultra Black gasket maker. This is just another form of silicone RTV, but it has some fillers that make it stronger, and it is rated to withstand a fair amount of fuel and oil exposure.
After spending a fair amount of time scraping off as much of the old white silicone seal as possible with a plastic scraper, Scotchbrite, and rags, I applied masking tape to limit the RTV spread.
With the area masked off, I went to town with a tube of Ultra Black. A day after the first application, I went back to reinforce any areas that appeared to be thin. I gave the goop another day to cure, then did a test flight.
Success! We saw an initial 10 ppm on the monitor, which I attribute to another run-up with a tail wind. Once we were in the air the monitor mostly showed CO level at zero, with an occasional blip to 4 ppm (the lowest level the Clip will display). There were grass fires in the area, so the CO I saw in flight might have been supplied externally. Once I got away from the local area that had fires, the CO monitor settled down to a steady zero.
Postscript and New Procedures
I recently signed off on our annual inspection, and went on an hour-long, post-maintenance check flight. Carbon monoxide levels were stuck on zero for the entire flight, at multiple flight attitudes and steep turns. We came up 4 ppm briefly when I did the normal-for-me shutdown in front of our hangar, with a tailwind and windows open.
When I shut down, I run the engine to 1,500 rpm with a very lean mixture for 15 to 20 seconds, to burn off any carbon accumulated on plugs during taxi. Here’s my procedure: Turn off avionics master, pull the throttle back near idle, and then immediately pull the mixture to idle cutoff and turn off the master switch. Turning the master off prevents the alternator controller from struggling while the engine is coasting to a stop.
Jerry LeCroy has been a pilot since 1971, and holds private, instrument, SEL/MEL, and commercial ratings. He is also an A&P/IA. Jerry worked as an engineer on defense and space programs most of his career, mostly on spacecraft and rocket design. He spent the last eight years before his retirement from Boeing working on 787 systems design and certification, and in the process got to learn a lot about approaches and design rules used for designing and building reliable and serviceable commercial aircraft. Today Jerry owns and flies a 1981 R182, which his wife describes as “the best plane ever.”

