Excerpted from the June issue. Read the full article with pictures here.
In their wisdom, the FAA recognized years ago that an owner sometimes likes to tinker with his or her airplane. Back when the FARS were drawn up, the general population was more mechanically inclined than today. Every garage had a tool box and, while there were exceptions, most pilots knew their way around it.
Pilots were somewhat considered “gearheads” since they worked around an airplane, doing all sorts of little things to prep for flying – the same way generations had approached owning a car. It was natural, therefore, for the FAA to consider what was critical on an aircraft, versus what was considered pretty much fool-proof or easy for an untrained aircraft mechanic to comprehend and fix themselves. From this mindset, we got the FAA Approved List of Owner Maintenance items.
You Can Do This
One of the easiest things an owner can do, even though it may not sound easy, is changing the brake pads. Most aircraft in the GA fleet use a caliper/disc assembly; either McCauley or Cleveland (Parker-Hannafin). These use hydraulic fluid, pushed by the brake pedal or powered by a brake handle, to push a piston against a disc that is secured to the aircraft wheel.
Hydraulic fluid is not compressible and is rather inert, and operating the master or slave cylinder hooked to your brake pedal basically creates a cable within a tube. It is a very lightweight, simple system, and rarely needs maintenance unless a leak develops, or the brake pads wear out.
An owner cannot do anything about a leak, as working on the hydraulic system is considered a certed-mechanic job. The hydraulic line or any fittings cannot be touched. The brake pads, however, are fair game.
Excerpted from the June issue. Read the full article with pictures here.
About Brake Assemblies
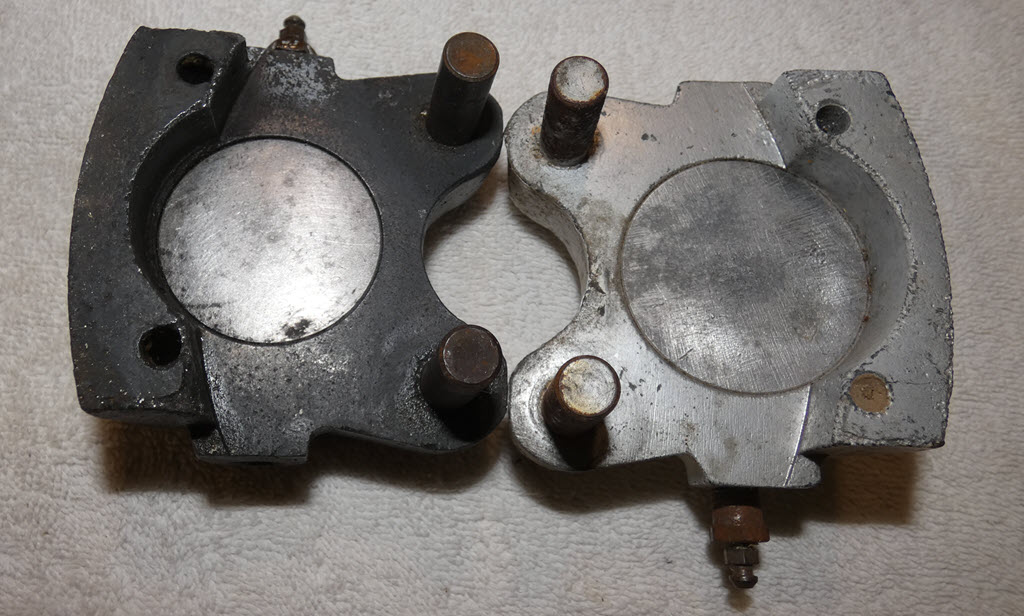
Each brake assembly is made up of a caliper, which is a cast body machined to accept a piston and drilled for hydraulic fittings for activation or filling (bleeding), and a series of parts needed to align and hold the brake linings.
A piston is inserted with a large O-ring to provide a seal, so the fluid does not leak out. This seal can develop a leak, and there are stories of blowing the piston out of the caliper, expelling all of the fluid. I don’t know if this is possible … it’s a story (or perhaps an urban legend)!
It is possible for the O-ring to leak over time and you will see evidence of this in a dark, gooey, dust-filled stain. If you do notice that, clean it and check later. It is a mechanic’s task, not yours, to replace the seal and bleed the brakes.
Into the brake caliper are fitted two smooth steel rods that are machined for a bolt on one end. These are the anchor bolts and are very important to keeping the brakes applied and worn evenly. They must be cleaned, inspected, and lubricated. This assembly enables the entire assembly to “float,” being held in place by the torque plate that is bolted to the gear axle assembly. If the caliper did not float, there would be no way to apply even pressure to both sides of the brake disc. You’ll see soon how this all works.
The pressure plate is fitted onto these anchor bolts. This is about an eighth-inch steel plate with Mickey Mouse ears, and a brake pad is mounted to the inboard side at the top. The piston pushes this plate/pad against the inside of the brake disc.
The disc itself is securely bolted to the wheel. As you will see at some point, our wheels come in halves and must be separated to install a tire. The three bolts that hold them together also hold the brake disk firmly to the wheel. The wheel /disc on landing will go from 0 mph to whatever your touchdown speed is … INSTANTLY! On jets this can be up to 120 mph.
Bolted to the caliper is the backing plate, which holds brake Pad No. 2. This is immovable. The pressure of the inboard pad pushes the pad to the disc face, which, because of the sliding action on the anchor bolts, pushes the caliper away from the disc. This in turn pulls the inboard pad against the inside of the disc, equalizing the pressure on both sides of the disc. It is exactly how an automobile brake works.
Hot and Heavy
The heat generated by the brakes is tremendous, and this is dealt with by the materials that make up the pad. This is proprietary info but let’s just say that the pads are pretty amazing chemistry. The kinetic energy of the plane, which the engineers tell us equals the weight of the aircraft multiplied by the speed (squared), is converted to heat when friction is applied by the brakes.
Proper use of brakes on landing and taxiing ops have a huge effect on the pads. Heavy braking can cause a real chemical odor and a burning smell, and brakes can fade out if they get too hot. Heat in our brakes is dissipated by convection, radiation, and conduction. Many homebuilt aircraft with very tight wheel pants for speed need louvres cut into the pants for cooling.
Aviation Hydraulic Fluid (Red, MIL-PRF-5606A), is a mineral-based, high-viscosity index oil. It is one of the cooling factors for brakes (conducting heat away). It has a high heat, low temp operating range, but will boil at 475 degrees C and sustain combustion at 180 degrees C.
Riding your brakes or heavy braking if you land very long could create a lot of heat very quickly and can boil any water or vapor that is in the line, and you can suddenly lose that brake. An owner can top off the brake reservoir, but that is about all one can do with hydraulic fluid.
Excerpted from the June issue. Read the full article with pictures here.
The Pads Are Accessible
The good thing is that to change your brake pads, you do not have to break the system. With the wheel pants off (if you have them), simply loosen and remove the two 7/16-in. bolts on the top of the caliper that run through the caliper and thread into the backing plate. This will free up the caliper for you to pull it gently away from the brake disc and inspect it and remove the pressure plate from the anchor bolts.
Each pad is secured to the plate with two brass rivets (three on some models). In the old days, you would punch these out with a hammer and punch from the plate side. This is the side where the rivet looks like a donut. Newer brake tools use a jack screw arrangement to slowly but forcefully push the soft brass rivet through the hole. This tool was pioneered by RAPCO and today is the industry standard. RAPCO stands for Replacement Aircraft Parts Company, and is based in Hartland, Wisconsin, just outside of Milwaukee. The tool, RA825, is simply locked into a vice and the punch adapter is installed on the end of the shaft and the handle turned to push the rivet out.
After cleaning the plates, you simply insert a rivet in through the recessed hole in the pad, place the pad with the rivet head side down, and with the knurling adapter on the shaft and the handle turned to set the rivet. The old tools required striking the shaft with a hammer, resulting in some cracked rivets and/or pads. The new tool eliminates this problem, along with damage to the plates if the set wasn’t aligned properly.
Almost Finished
This article is for Members Only.
Excerpted from the June issue. Read the full article with pictures here.

