 Under the Cowling
10 Quick-and-Dirty Tips to Enhanced Oil System Maintenance
Oil cleans, cools, and reduces friction as it circulates through an engine. Oil also coats internal engine parts, helping to prevent corrosion. In short, oil is the lifeblood of your plane’s engine—and a healthy oil system is vital to the proper operation of any engine. On the other hand, the oil system is also the system that typically requires the most regular maintenance. To help maintain a healthy oil system and be better prepared to identify, prevent, and address potential problems should they develop, here are 10 simple tips (and a few tricks) that almost any backyard mechanic can use:
- Regular oil/filter changes (along with always maintaining proper oil levels) will help to increase performance and prolong engine life.
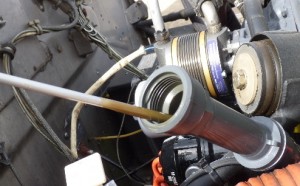
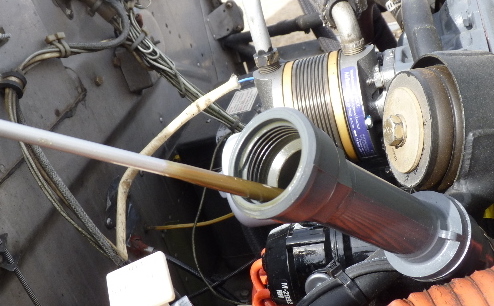
When it comes to proper engine performance, it’s no secret that clean oil functions better than contaminated oil. If mounted remotely, the oil cooler should be drained so that as much of the old dirty oil is removed as possible. Be sure to remove and clean the sump screen in the oil sump as well.
Airplanes that have an oil filter kit as an add-on still require cleaning of the original oil screen. Oil passes through this screen before it reaches the filter, yet many mechanics simply replace the filter without cleaning the screen. If the screen clogs it will cause reduced oil flow through the engine.
- Filters should always be cut open and checked for metal.
Oil change intervals vary, but shouldn’t exceed 50 hours. However, closer intervals are recommended if metal was found at the previous oil change. Engines sometimes make a little metal and then stop. Very small amounts of non-magnetic metal aren’t necessarily a cause for concern, but steel fragments can be more alarming and may come from a number of places, including the main and camshaft bearings.
Engines undergoing excessive wear will often produce fine metal shavings that end up in the oil filter. Aluminum shavings found in the oil filter are likely from either the pistons or the piston pin end plugs. Rocker arm bushings are made with brass. As they wear, they too produce fragments that get caught in the oil filter. It’s important to check the filter regularly to see what kind of metal is present and whether or not the amount is increasing.
After an overhaul it’s good to change the oil after the first hour; then again at five-hour intervals at least a couple of times. This will help to remove any metal generated during the cylinder break in period.
- Oil temperature is very important to ensure proper operation and should be at least 180 degrees during operation.
Covering all or part of the oil cooler with tape helps keep the oil temperature up during the winter months.
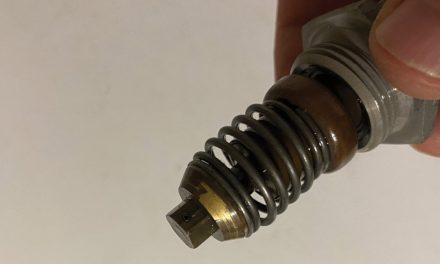
NOTE: The thermostatic bypass valve installed on Lycoming engines uses metallic expansion based on temperature to open/close—the same way a car’s thermostat operates. These valves are normally open and expand with heat to close, forcing the hot oil to flow through the oil cooler. However, several of these valves have a service bulletin that calls for checking the security of the lock nut that holds the seat and springs in place. The retaining nuts on some of these valves have been known to come off (due to an improper crimp) and get circulated into the system. If the nut is missing, it can usually be located at the oil cooler entrance. Lycoming service bulletin 518C gives instructions for inspecting and heat-treating these nuts with Loctite-290 (the green kind).
- Engines that haven’t been started in a long time should be primed to reduce wear during the start.
This can be accomplished by first removing all the spark plugs. With the plugs out, the propeller will rotate very easily because there’s no compression in the cylinders and there’s no chance that the engine will accidentally fire. Next, squirt oil into the cylinders and then rotate the propeller (by hand) to lubricate the cylinder walls and to get the rings limbered up.
- Continental O-470 engines that have sat without use for an extended period should have the lifter bodies removed and inspected for corrosion spots.
These should have a clean smooth surface because they ride on the camshaft lobe as it rotates. They tend to form rusty freckles that eventually become pits once the rusty area breaks loose. These pits then scrape against the camshaft, causing it to wear.
- Oil that becomes black and thin after just a short period of time is a sign of piston ring or cylinder wall wear.
Some of the oil in the combustion chamber during the power stroke gets burned and circulated throughout the system causing all the oil to turn a dark black color. Used oil from a healthy engine is gray in color—not jet-black.
- Operators using plug-in pre-heaters during the colder months should plug them in only a few hours before flight.
If they remain plugged in continuously they can cause condensation to form in the internal spaces of the engine compartment.
- Use high-quality detergent oil.
Generally, multi-viscosity oils provide better protection at start-up, while straight weight oils provide better protection at higher operating temperatures. Semi-synthetic oils tend to work well, especially in cold climates.
- Low oil pressure indications should be investigated right away.
Small Continental engines (O-200, C-85, etc.) usually have a very low oil pressure indication at idle once the engine is hot and has been run for a while. However, low oil pressure indications at higher than idle rpms are cause for concern on these engines.
On a related note, oil pressure that is slow to register on the gage (typically after the engine has been running for a couple of minutes) may be caused by thick dirty oil in the small line running between the gage and the engine. To help the gage read quicker, remove the tubing, spray it out with a good degreaser, and then refill it with thin low viscosity oil.
- Fly regularly!
Don’t leave your plane/engine sitting unused for extended periods of time.
